

Vinyl to CD Tutorial part 2.
Vinyl Audio Restoration using Wave Corrector
This tutorial is designed to be interactive. You will need to download a short demonstration file in order to practice the techniques described below.
At various points you will see a  symbol. Follow the instructions at these points to practice the techniques described.
- Overview of Audio Restoration
- Mis-Operation of Audio Restoration Software
- The User Interface
- The Correction List
- The Overview Window
- Auditioning Corrections
- Playing Tracks
- Wave Corrector User Options
- Adjusting Individual Corrections
- Deleting and Inserting Individual Corrections
- Finding Critical Corrections
- Block Operations
- Keyboard Shortcuts for Common Tasks
Overview of Audio Restoration
Vinyl is a relatively delicate medium which is easily damaged by the presence of dust and grit which becomes embedded in the record groove during normal play. A disc can also become damaged by the careless lowering of the stylus or by other hard objects. All these types of damage cause so-called ‘impulsive noise’ disturbances which produce sounds ranging from tiny high frequency ticks to loud unpleasant clicks and plops. Particularly annoying are the repeating clicks which occur when the damage has spanned several adjacent record grooves and which consequently repeat once per revolution of the record.
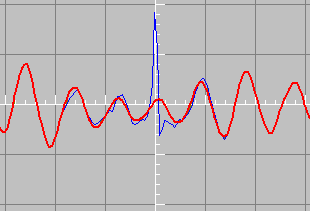
Audio restoration is the name given to the process of removing these disturbances and reconstituting the original waveform. The following illustration shows a typical click (in blue) overlaid by the restored waveform.
Audio restoration is a two stage process. Initially the wave file is scanned using an algorithm which discriminates between wanted musical content and unwanted noise. This is a far from trivial task because some musical instruments, especially low frequency brass and reed instruments, have waveforms remarkably similar to typical clicks. The waveform can be analysed in either the time domain, the frequency domain, or a combination of the two. Generally speaking, the goal is to identify instantaneous deviations in the data which are statistically significant. These ‘outlier’ events are usually indicative of an impulsive noise spike.
The second stage involves removing the unwanted portion of the wave and replacing it with an approximation of the pre-damaged waveform. Generating the replacement waveform is another difficult procedure. If the noise spike is very short and only spans a few samples, then linear or Bezier interpolation may provide a sufficiently accurate replacement. However, in the case of longer duration impulses, a more sophisticated approach is necessary if the noise is to be effectively masked. The techniques used to mask these longer impulses include:
- muting.
- inserting a combination of frequencies which the ear finds difficult to recognise.
- generating a waveform based on the frequencies present in the surrounding wave.
Wave Corrector uses the third of these options. The example illustrated above shows how the corrected wave matches up with the surrounding wave and blends naturally with it.
For very long disturbances, none of these techniques are possible. In this case a procedure called 'cut and splice' can be used. This removes the unwanted noise and cross fades between the sections before and after the cut. This obviously shortens the recording slightly and care must be taken to preserve the tempo of the music.
Mis-Operation of Audio Restoration Software
Because click detection is an imprecise process, it is quite common for audio restoration software to produce imperfect results. This is because the software must balance the conflicting requirements of detecting as many clicks as possible whilst at the same time not being triggered by musical forms resembling clicks. When this balance is incorrect, the result is:
- false negatives - the failure to detect and correct a click even though it is audible to the human ear.
- false positives - detecting and adversely modifying parts of the music where the ear does not perceive any clicks.
- a combination of both the above.
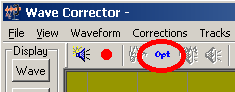
Ganymede’s Wave Corrector software provides a number of features which allow the user minimise these adverse effects. These features include the ability to re-scan selected blocks of the wave file as well as the facility to insert, delete and adjust individual click corrections. By these means, most of the problems usually associated with audio restoration can be overcome.
The User Interface
Although many of Wave Corrector's functions are fully automated, it is still important to understand your way around the program screen in order to take full advantage of its more advanced features.
The Wave Corrector interface is somewhat different from other wave editors you may be familiar with. This is because of the novel way in which the program operates. It maintains two copies of the wave being processed – the original wave; and the corrected wave. ‘Corrections’ are a key concept in Wave Corrector. They are applied at every point where the program detects an audible click. The program removes the click and generates a corrected version of the wave – the Correction.
In the main window, the two waveforms are overlaid on each other so you can easily identify where corrections have been applied. To aid the manipulation of corrections there is a Correction List. This enables you to jump immediately to a particular correction and audition or adjust it if required.
To proceed with the tutorial, you will need the sample file demo1.ape. If you have not already done so, download the file at the following link: demo1.ape. Right click on the link and select the option 'Save Target As...'
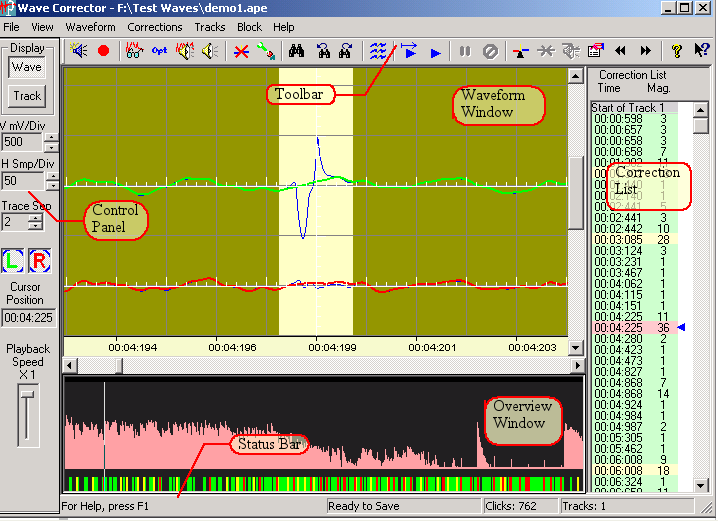
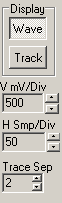
Two buttons in the top left hand corner of the screen are used to select the display mode of the main screen, Wave or Track.
Track mode enables you to easily edit the start and end of album tracks. This is covered in Tutorial 4.
For this tutorial we will use the Wave display mode. Whenever you select a click correction (as you did by pressing F3 above), then Wave mode is automatically selected.
Wave mode shows a conventional oscillogram type image of the waveform.
The upper (green) trace represents the left channel; and the lower (red) trace represents the right channel. When the window shows a click (as above), it depicts the original uncorrected waveform in blue. The blue traces are overlaid by the red and green. Therefore you can see immediately those locations where the program has modified the original wave – because the blue trace protrudes from behind the red or green traces at these locations.
|
Exercise 2. Navigating in Wave CorrectorThe controls on the left labelled ‘V mV/Div’ and ‘H Sec/Div’ are used to zoom in and out, vertically and horizontally. Click on the arrows to change the scale of the display. If you have a scroll wheel on your mouse, you can also use this to zoom in and out. Use the wheel on its own to scroll horizontally; or in conjunction with the shift key to scroll vertically. A third option for zooming is to use the arrow keys on the numeric keypad (keys 2,4,6, and 8). The ‘Trace Sep’ control enables you to vary the vertical distance between the left and right channel traces. If you set this distance to zero, then the traces overlay one another and you can visualise the difference between the stereo channels.
Also in the left panel are ‘L’ and ‘R’ buttons . These toggle the left and right traces on and off.
Also, when you audition a section, you can use these buttons to turn the audio on and off on their respective channels. |
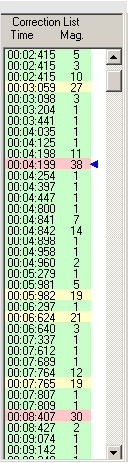
The Correction List
The main purpose of the Correction List is to show all the clicks that have been detected by the program and to identify their exact position and estimated magnitude. The clicks are colour coded according to their severity.
|
|
Exercise 3. Selecting Click CorrectionsClick over a correction in the list to select the correction for viewing, auditioning or editing. You can also use the up and down cursor keys to move between corrections. With noisy files, the Correction List can become very long an unwieldy. To make it more manageable, you can restrict entries to clicks above a certain magnitude. To do this, use the List... command on the Corrections Menu. Before continuing, use the List.. command again to restore the list to shown All Corrections.
You can also search for corrections of a given magnitude (or greater). To do this, use the Search toolbar button shown below. Enter a search for say, Magnitude 15+ (red/yellow).
A
To the right of the Search toolbar button are the subsidiary buttons, Search Forward and Search Backward. Use these to repeat the search. The function keys F3 and F2 can also be used to search forward and back respectively. |

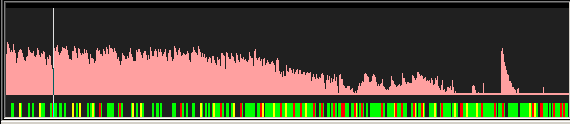
The Overview Window
The Overview Window normally shows a histogram of the entire file, the height of the histogram represents the audio volume. If the file has been split into tracks, then alternate tracks are shown in pink or blue. (It is also possible to make this window to show a single track. This is covered in Tutorial 5.)
Across the bottom of the window, there are red, yellow and green markers representing the positions of all the clicks detected by the program.
A vertical white marker shows the point where the main window is centred on.
Exercise 4. Using the Overview WindowThe Overview window is used for navigation and selection. Click anywhere in the window to recentre the main display. The correction nearest the point where you clicked will be selected.
You can also select a block in the Overview window. Hold down the left mouse button and drag with the mouse to select. Note how the horizontal scale of the main window is adjusted to show the block. To get an idea of what block functions are available, look on the Block menu.
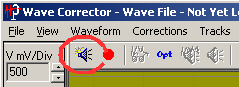
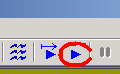
The Overview window is also used during playback. To demonstrate this, start the track playing by clicking on the Play Track toolbar button:
Click anywhere in the Overview window to jump to a new play position. Pause and resume playing with the Space Bar. The Backspace key jumps back about a second. The Escape key or the Cancel Playback toolbar button stop playback. |
Auditioning Corrections
For auditioning individual corrections or short section use the Audition toolbar buttons:
Exercise 5. Auditioning Individual Clicks and their Corrections
These Audition commands play the contents of the main window. Play starts at the left hand side of the window and terminates at the right hand side. If you are zoomed so much that the window width is less than 2 seconds, then playback lasts for 2 seconds, centred on the window.
|
 Audition Original
 Audition Corrected
Playing Tracks
As well as the Audition buttons, there are two further buttons for playing longer sections or an entire track.
Exercise 6. Playing Entire Tracks
Play From Start starts at the beginning of the current track; when it gets to the end of the current track, it loops back to the beginning. Playback continues indefinitely until you hit the Cancel button.
When you stop playback, green marker is placed in the Overview window to indicate where you've stopped. This is used by the Play From Marker button to allow you to resume playback from there rather than starting again from the beginning.
If you are interested in a particular section of a track, you can jump immediately to any point by clicking over it in the Overview Window or by double clicking in the Main Window. |
|
|
 Play From Start
 Play From Marker
 Cancel Playback
 Pause/Resume Playback
Wave Corrector User Options
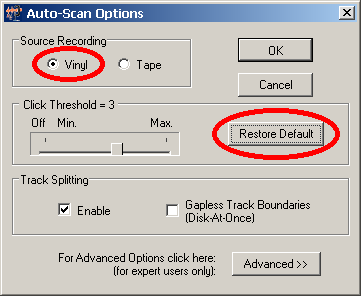
The Wave Corrector Options dialogue is shown below. Select 'Vinyl' as the source and a detection threshold as described in the next section. (Note, the other two settings affect track detection and are not covered in this tutorial.)
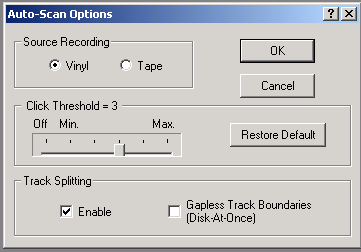
Click Threshold
The click threshold can take values from 1 to 5 with a default value of ‘3’.
Note, you can also set the click threshold to ‘0’. This turns off click detection completely and allows you to use Wave Corrector simply for its track splitting functions.
The default setting (3) should be suitable in the majority of cases and novice users should use this setting whilst they gain experience of using Wave Corrector.
Settings 1 and 2 are the least sensitive settings and may occasionally be required if the source material is such that you need to globally reduce the number of ‘false positives’ being detected.
Settings 4 and 5 should only be used with care. If your source recording is exceptionally noisy with a very large number of clicks, then these settings will sometimes yield an improved result. However, this will be very dependent on the musical content. These settings reduce the Wave Corrector’s ability to discriminate between music and noise and therefore will only be useful if the musical content itself is relatively un-noise-like in its characteristics. Piano, strings and human voice can all be safely scanned at settings 4 and 5. However, if the music contains low frequency reed or brass instruments, cymbals or similar percussion instruments then these settings should be avoided.
In many cases it will be better to scan at setting 3 and then ‘super-scan’ those parts of the wave file which are still noisy. ‘Super-scan’ is one of Wave Corrector’s advanced features designed to allow the audiophile to enjoy better results than a purely automatic process is able to achieve.
Subsequent sections describe these advanced features in more detail.
Adjusting Individual Corrections
At a fine level, it is also possible to manually adjust individual corrections. Adjusting a correction enables you to alter the shape of the corrected wave and hence to affect its audibility.
Wave Corrector automatically generates corrections based on its estimates of the precise position and width of each click. The Wave Corrector display indicates these click parameters by means of a light yellow band. By adjusting the position and width the yellow band, you can alter the corrected wave. By manually adjusting the correction, you may obtain a better match of the underlying wave.
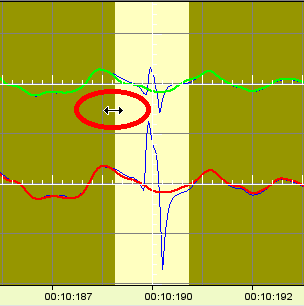
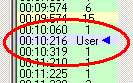
To practice this use the file demo1.ape and navigate to the correction at 10:216 seconds. This is the second red correction in the Correction List. This is an example of a click that has been slightly over-corrected and a better match can be obtained by manual adjustment.
Exercise 7. Adjusting a CorrectionNavigate to the correction at 10:216 seconds and move the mouse to the edge of the pale yellow area at the centre of the screen. The mouse pointer changes to an East-West pointer. Click the left mouse button and the program starts correction adjust mode. In this mode you can alter the position and width of a correction. Holding the left button down, drag the edge of the yellow area to widen or narrow the correction. As you move it, note how the shape of the corrected waveform changes.
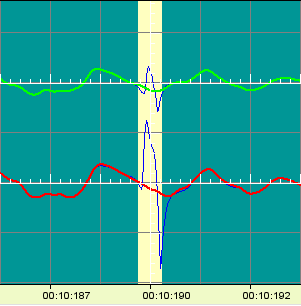
Before Adjustment
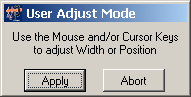
After Adjustment While in the Correction Adjust mode, you can alter the position of a correction using the left and right arrow cursor keys. As well as using the mouse, you can also use the up and down arrow cursor keys alter the width. During Correction adjust mode, the screen background colour changes to blue-green (as above) and a confirmation box is displayed to enable you to accept or reject your adjustments:
To confirm your changes, click the Apply button.
|
Deleting and Inserting Individual Corrections
It is also possible to manually delete and insert individual corrections.
Exercise 8. Deleting and re-Inserting a CorrectionTo delete the currently selected correction, use the 'Remove Current' command on the Corrections menu or use the keyboard shortcut (Delete Key). To practice this, navigate back to the correction at at 10:216 seconds and press the Delete key. A confirmation dialogue asks you to confirm the deletion. To do this, move the mouse pointer to the centre of the screen. The pointer changes to East West arrows. 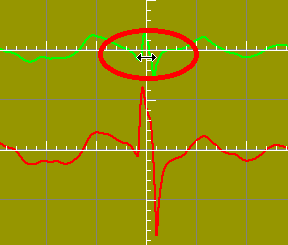 Now, hold down the left mouse button and drag. A new correction will be inserted.
To confirm your changes, click the Apply button. Your manual correction will be highlighted in blue in the Correction list.
|
It is also possible to insert corrections ‘on the fly’ during track playback. To do this, simply hit the Space Bar at each instant you want a correction inserted. When you have finished playing the track, you will need to go back and adjust these manually inserted corrections to position them exactly over the clicks you want to correct. Before adjustment, these ‘cued’ corrections are highlighted in white in the Correction List. They are initially set to zero width and hence do not have any effect until they are manually adjusted.
Finding Critical Corrections
Wave Corrector categorises corrections according to the estimated severity of the underlying click. Generally speaking, only the most severe corrections are likely to require user adjustment. These are highlighted in red in the Correction List. Medium severity corrections are highlighted in yellow, and the least severe ones are highlighted in green.
You can jump immediately to the next or previous ‘red’ correction using toolbar buttons provided for the purpose. This enables you to quickly audition the critical corrections to decide whether any manual intervention is necessary.
Finding False Positives
One of the main uses of the block operations is to remove the ‘false positive’ corrections which the program has applied to particular sections of a wave file music where the music is difficult to distinguish from noise. Sometimes these mis-corrections are difficult to locate since the audible effect is very often minimal. You may say that in such cases the mis-corrections might as well be ignored but if you are a perfectionist Wave Corrector provides a useful option called the ‘correction signature’ to help you find them. To activate the correction signature, select ‘Signature’ from the View menu.
The signature is a thin red line which rises and falls to indicate the rate at which Wave Corrector is making corrections during the course of the wave file. A high correction rate during medium to high amplitude music is probably indicative of the false positives. Such areas should be auditioned and false corrections removed if necessary.
Block Operations
Block operations allow you to mark a block of the wave file and then to re-scan or delete corrections in the block.
To select a block, drag with the mouse in the Main window whilst holding down the left mouse button. The selected block is highlighted in blue.
NB, do NOT attempt to select a block whilst the mouse cursor is displayed as an E-W arrow. This form of the mouse cursor indicates that the mouse is hovering over the edge of a correction and if you press the mouse button at this point then ‘Correction Adjust’ mode is entered instead of ‘Block Select’ mode.
Having selected the block, you can now perform one of four actions:
- delete corrections - this deletes all corrections in the block and restores the original waveform.
- re-scan - this deletes all the existing corrections in the block and re-scans using a new click threshold. Thus you can selectively re-scan the block at a higher or lower sensitivity than the global setting for the entire file.
- super-scan- this leaves all the existing correction in place and re-scans the corrected block to mop up any remaining clicks. Again, the re-scan can be done a t a higher or lower sensitivity than the global setting for the file.
- cut and splice.
The first three of these are fairly self explanatory but the last, 'cut & splice' deserves a little more explanation.
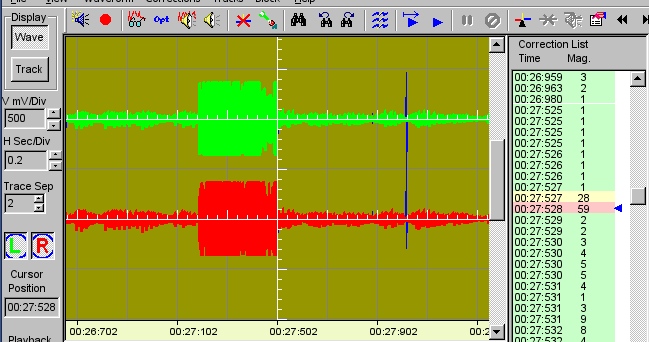
Cut & Splice allows you to remove a section form a wave and cross-fade across the removed section. This provides a near silent transition and is a very powerful technique for removing unwanted noises. To illustrate this the demo1.ape file includes a deliberately introduced noise that we'll use cut& splice to remove.
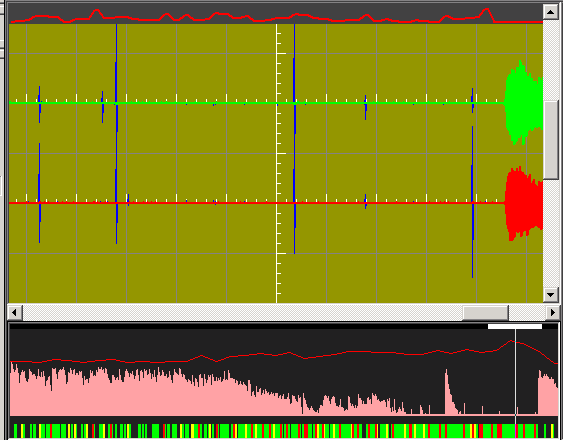
Exercise 9. Removing a Noise with Cut & SpliceLoad in the file demo1.ape and select the correction at 27:258 seconds. Then adjust the horizontal scale to 0.2 sec per division. You will see the waveform illustrated below.
Note the high pitched distorted section and mark it as a block. To mark a block, hold down the left mouse button and drag across the area you want to mark. You should end up with the image shown below.
When you are satisfied that the block is positioned correctly, right click over the block to bring up the block context menu menu and select 'Cut & Splice'. The block will be removed form the waveform.
|
 Use the Audition buttons to play the section.
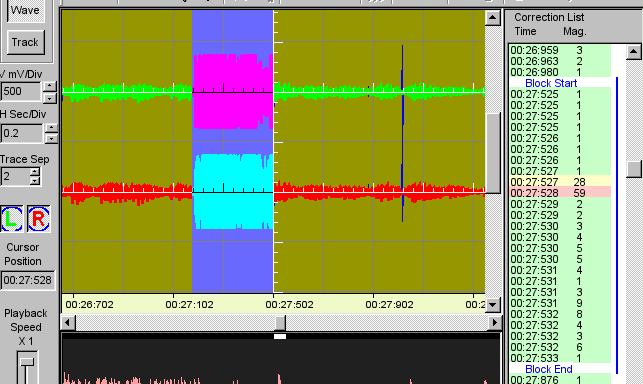
Keyboard Shortcuts for Common Tasks
Open File Ctrl + O
Save Ctrl + S
Record Ctrl + R
Batch Process Ctrl + B
Exit Wave Corrector Alt + F4
Help F1
Context Help Shift + F1
Next Correction Cursor Down
Previous Correction Cursor Up
Scroll Left Cursor Left
Scroll Right Cursor Right
Remove Correction(s) Delete
Insert Correction Insert
Shrink Correction Page Down
Insert Cue Marker Numeric Pad + / Tab
In most screens Right click mouse for context menu
During Correction Adjustment:
Confirm (Apply) Edit Return
Cancel Edit Escape
Playback Commands:
Play (track) Original Shift + Space Bar
Play (track) Corrected Space Bar
Audition (click) Original Numeric Pad 1
Audition (click) Corrected Numeric Pad 3
Pause/Resume Numeric Pad Del / Space Bar
Stop Numeric Pad 0 / Escape
Jump Play Back Numeric Pad Enter / Back Space
Speed Up Numeric Pad 9
Slow Down Numeric Pad 7
Signal View
Vertical mV/div:
Expand Numeric Pad 8
Condense Numeric Pad 2
Horizontal t/div:
Condense Numeric Pad 4
Expand Numeric Pad 6