

Vinyl to CD Tutorial Part 1. Recording Vinyl on a PC
- 1. Introduction
- 2. Equipment needed
- 3. Turntable/ Pickup Arm
- 4. Pickup Cartridge
- 5. Stylus Maintenance
- 6. Record Cleaning
- 7. Pre-Amplifier
- 8. Interconnecting Equipment
- 9. Test Recordings
- 10. The Recording Chain
- 11. A/D Conversion
- 12. Setting the Record Level
- 13. Channel Alignment
1. Introduction
Playing vinyl for digital re-mastering is a little different from playing for normal listening. You will want too ensure absolute optimum quality because any imperfections at this stage will be permanently incorporated into your CD-R copy. You may, for example, decide to play using a slightly higher than normal tracking force since the additional wear to the vinyl is outweighed by the improved noise and distortion characteristics attained.
2. Equipment needed
The following equipment will be needed to produce a signal capable of driving a typical multimedia PC soundcard.- A turntable and pickup arm fitted with a good quality cartridge and stylus.
- A Pre-Amplifier with RIAA equalisation.
- Interconnecting cables.
3. Turntable/ Pickup Arm
Before embarking on a recording session, you must ensure that the turntable and pickup are correctly set up. This means that the turntable must be positioned on a solid level surface free from vibration. The pickup arm should be inspected to ensure that the cartridge is correctly installed for minimum horizontal tracking error and the correct playing weight. The cartridge manufacturer will specify a range of playing weights. For mastering, it is advisable to set this adjustment near the maximum recommended value. Having set the playing weight, you should then ensure that the side thrust (anti-skating) adjustment is correctly set. The arm manufacturer will have provided instructions for making these adjustments.
4. Pickup Cartridge
There are many types of pickup cartridge including crystal/ceramic and various magnetic types - moving coil, moving iron and moving magnet. Your pickup arm will probably have been supplied with a cartridge to suit the characteristics of the arm. If you choose to change the cartridge, it is important to ensure that the compliance of the replacement cartridge matches the arm. Otherwise unwanted resonances can severely compromise quality. If a low compliance cartridge is fitted to a high compliance arm then the tracking performance will be impaired, particularly during loud sections of music. Conversely, a high compliance cartridge fitted to a low compliance arm will result in mis-tracking if the record is not perfectly flat. Additionally, a large sub-audio signal will be generated due to the undulating motion of the cartridge over a non-flat record.Most moving coil cartridges have a very low output voltage (~200 microvolts) and are supplied with a step-up transformer or a low noise amplifier to match the level (~10 millivolts) of a typical magnetic cartridge. Some modern moving coil cartridges are so called ‘high output’ and do not need a transformer or amplifier.
A very small number of magnetic cartridges (eg Decca ffss) should not be used with a ferrous turntable because the strong magnetic field of the cartridge will be attracted downward causing serious damage to the cartridge.
Crystal/ceramic cartridges require special equalisation and will not produce the high quality output obtainable from a typical magnetic cartridge. For these reasons they are not recommended.
5. Stylus Maintenance
One of the most common causes of audio distortion when playing vinyl is contamination of the stylus. The contamination occurs when surface dust gradually accumulates on the stylus during play causing the distortion to get progressively worse.Before playing each side of a record, always clean the stylus using a fine (camel hair) brush soaked in alcohol (IPA). Gently blow it dry before use. Only move brush from back to front (ie in the direction of record movement), NEVER from front to back or from side to side. High compliance cartridges, in particular, are very easily damaged so extreme care should be taken when cleaning your stylus.
When the side has finished playing, inspect the stylus for contamination. If the contamination is significant, you should consider re-recording part or all of the side. Only in this way will optimum results be maintained.
Your stylus should be regularly checked for wear as a worn stylus will permanently damage your records.
6. Record Cleaning
A vinyl record must be as clean as possible to achieve optimum audio quality. The main reason for cleaning a record before each play is to remove surface dust which would otherwise accumulate on the stylus and impair the sound. The recommended cleaning method is to use a carbon fibre brush such as the ‘Decca Record Brush’. This also helps to reduce static and reduces the further accumulation of surface dust.If your records have not been played for some years, dirt may have become ingrained in the grooves. In such cases, the record should be played at least once before recording. This will help remove dirt remaining in the groove and allow you to inspect the stylus to confirm the absence of contamination. If playing the record reveals high levels of background noise, or if the stylus becomes repeatedly clogged with dirt after playing, the record should be deep cleaned.
Deep cleaning involves covering the surface of the record with a mixture of alcohol and distilled water and then scrubbing and vacuum drying to remove all traces of residue. This task is accomplished using a ‘Keith Monks’ or similar specialist machine. A number of record/hi-fi shops will provide this service for a small charge. The results are usually dramatic.
7. Pre-Amplifier
A pre-amplifier must be used to amplify the low level signal from the pickup to a suitable level (~1volt) for a multimedia PC soundcard. Also, the pre-amplifier must provide the correct equalisation (RIAA) to ensure a flat frequency response from the record.
Some hi-fi systems integrate the pre- and power amplifiers into a single unit. In this case, it will usually be possible to utilise the output intended for tape recording to feed the soundcard.
It is very important not to drive too high a signal level into the PC soundcard. Otherwise, clipping distortion will occur. For this reason, your pre-amplifier should ideally have an adjustable output level. If your output level is fixed, then you will need to use the gain control in the Windows mixer applet to adjust your recording level. See Part 2 of the tutorial for a description of setting the recording level correctly.
8. Interconnecting Equipment
Most PC soundcards utilise a 3.5mm jack as the line input connector. Conversely, most hi-fi equipment uses either phono or DIN connectors. You will therefore need to fabricate or purchase a connecting lead which converts between the two connector standards.Ensure that all connectors are of good quality and that they all are seated correctly. Poorly fitting connectors are a frequent source of noise and sometimes hum.
Even when everything is interconnected properly, it is still possible for low levels of hum to be present due to poor earthing or multiple earth paths. During initial auditioning, you should satisfy yourself that your recording set up is not introducing any hum. If you find there is some hum present, then you will need to carefully check all connectors. If this does not cure the problem, you may find removing the power supply earth from one or other item is effective. Note, if you do this, you should ensure that your personal safety is not compromised.
9. Test Recordings
Because the CD-R is a ‘write once’ medium, it is very important that you ensure the integrity of your recording process before committing your collection of LP’s to the CD-R burner! Throughout this section, you will be advised at several points to make test recordings to verify audio quality. In this way, you can be sure that your results will be as good as possible. This is particularly important if you are going to use audio restoration software to process your recordings. Audio restoration software depends on detail in the original recording to differentiate music from unwanted noise. The better the quality of the original recording, the more accurate will be result of the restoration process.In some cases, you can make a test recording to your hard disk, for example to verify that the sound card is not being driven too hard and causing overload distortion. In other cases however, you will need to actually burn a CD in order to verify that all is well. For example, this is necessary to ensure that your left and right channels are not reversed. For these test recordings it is very useful to be able to use CD-R/W’s rather than CD-R’s. Unfortunately, CD-R/W’s will not play on the majority of audio CD Players. Therefore, if you use CD-R/W’s you may be restricted to auditioning the end results using the speaker system attached to your PC. In most cases this will be adequate but if your speakers are not of a good enough quality, you should consider using a pair of good quality headphones for these pre-mastering tests.
10. The Recording Chain

11. A/D Conversion
Digital recordings of an analogue source are made by sampling the analogue waveform and converting each sample to a numerical value. This process is known as analogue to digital (A/D) conversion. Note, the quality of the end result is determined by the number of bits used to express each sample value, and also by the rate at which the samples are taken. The CD audio standard specifies 16 bits per sample and a sampling rate of 44100 samples per second. 16 bits allow for a range of 216 (65536) possible amplitude values and each sample has to be assigned to one of these 65536 steps.Because the A/D converter only uses a finite number of steps, it is important that the analogue signal is presented at an appropriate amplitude if optimum results are to be achieved. If the signal is too small, the higher order bits will never be turned on and thus you may end up with only a 12 or 13 bit recording. Conversely, if the signal is too large, the A/D converter will be unable to assign a value to some samples because they are outside its range of possible values. In this case digital clipping occurs which is a severe form of distortion.
12. Setting the Record Level
To assist you in setting an appropriate level, most sound recording software provides you with a form of level meter which monitors the signal at the A/D converter input. Wave Corrector’s Level Meter is illustrated below. By convention, 0 (zero) level is the level at which digital clipping occurs; and signal levels are expressed in decibels (dB) relative to that level.
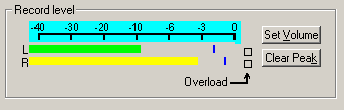
Usually when recording, the sound level should be adjusted so that the loudest sections peak in the -3 to 0 section of the bar graphs. However, some sound cards with poor analogue front ends have a tendency to exhibit audio distortion at levels somewhat below this. In such cases, it is best to record at a lower level and then to digitally adjust the level after recording. (this is known as ‘normalising’) The best way to ensure an optimum recording level is to do some test recordings before burning any CD-R’s. In this way, you can discover the appropriate recording level for your particular hardware components.
With most sound cards, you can adjust the recording level using the Windows ‘Volume Control’ (mixer) applet or any replacement applet which may be supplied with the card. The applet controls digital attenuators and switches which are built into your soundcard. Note that some sound cards do not have the hardware to support all features and you may find that some controls are inoperative.
If your hardware pre-amplifier incorporates an output level control, you should use this in preference to the Windows applet control. In this case, set the applet control to maximum and adjust the recording level using the control on your pre-amplifier.
The Windows applet is selected by double clicking on the ‘Volume’ icon in the system tray. If the icon is not there, select Programs/Accessories/Entertainment/Volume Control. Having opened the applet, select Options/Properties and then select ‘Adjust Volume For - Recording". Then make sure that the ‘Line’ check box is checked. This enables a volume control for the soundcard Line Input. Now check the ‘select’ check box under the ‘Line’ volume slider. If necessary, you can use the slider to set the recording level.
Now, open your recording program and adjust your recording level to a suitable level as indicated on the program’s level meters.
13. Channel Alignment
In the process of interconnecting the various components in the recording chain, it is very easy for the left and right channels to become reversed. It is also the case that some CD-R burning software introduces a reversal of the audio channels if it is processing wave files recorded by incompatible sound recording software. To verify that your channels are correctly aligned, make a test recording to CD-R/W before committing your first recording to CD-R.